How to Sharpen a Chainsaw Chain: The Ultimate Guide to Safer, Smoother Cutting

Few things are more frustrating than revving up your chainsaw and realizing it’s just not cutting right. The motor screams, smoke rises from the wood, and your arms are working harder than they should. Chances are, your chain is dull—and if you’re serious about getting the job done right, knowing how to sharpen a chainsaw chain is absolutely essential.
This isn’t just about tool maintenance—it’s about safety, efficiency, and saving money in the long run.
Why a Sharp Chainsaw Chain Is Non-Negotiable
Think of your chainsaw chain like a kitchen knife. Would you cut steak with a butter knife? Not only would it be messy, but you’d also risk injury. A dull chainsaw chain:
- Makes the saw harder to control
- Increases the risk of dangerous kickbacks
- Damages your saw’s motor and bar
- Slows down your work and causes fatigue
Sharpening your chain regularly ensures smoother, cleaner cuts and extends the lifespan of both the chain and the entire saw.
What You’ll Need Before You Start
To sharpen a chainsaw chain properly, gather these tools:
- Round file (specific to your chain’s pitch: common sizes are 5/32″, 3/16″, or 7/32″)
- File guide or holder (helps maintain the proper angle)
- Flat file (used for filing depth gauges)
- Depth gauge tool (to check raker height)
- Vise or bar clamp (to hold the chainsaw steady)
- Gloves and safety glasses (never skip these)
Check your owner’s manual for your chain’s specs, especially pitch and angle recommendations.
Understanding the Anatomy of a Chainsaw Chain
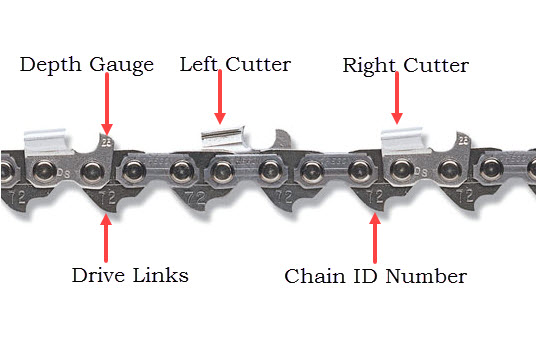
Before you sharpen anything, you need to know what you’re looking at. Your chain includes:
- Cutters: The sharp teeth that do the actual cutting.
- Depth Gauges (Rakers): Metal humps in front of each cutter that control how deep it bites into the wood.
- Drive Links: The part of the chain that fits into the guide bar.
Your goal is to sharpen the cutters evenly and adjust the depth gauges if needed.
Step-by-Step Guide: How to Sharpen a Chainsaw Chain
1. Secure the Saw
Place your chainsaw on a stable surface or in a vise. Lock the chain brake to keep the chain from moving.
2. Find the Starting Cutter
Locate the shortest cutter tooth on the chain. This will be your reference. Every other cutter should be filed to match its size.
3. Insert the Round File
Place the round file into the cutter’s curved edge, aligning it with the angle of the factory grind (usually 25°–35°). Use a file guide to maintain accuracy.
4. File in Smooth, Forward Strokes
Apply pressure only on the forward stroke and lift on the return. File each cutter with the same number of strokes (usually 5–10) until the edge is sharp and shiny.
Work on all the cutters facing one direction first (e.g., right-facing), then rotate the saw or move to the other side to file the opposite-facing teeth.
5. Adjust the Depth Gauges
After sharpening all the cutters, use the depth gauge tool to check the height of each raker. If one sits too high, file it down with a flat file so that it’s level with the tool.
Don’t skip this step—if the rakers are too high, your newly sharpened cutters won’t bite into the wood effectively.
6. Clean and Lubricate
Wipe down the bar and chain, remove filings, and apply fresh chain oil. Rotate the chain manually to ensure smooth movement.
How Often Should You Sharpen a Chainsaw Chain?

This depends on how often and what you’re cutting. You should sharpen your chain when:
- The saw produces fine dust instead of wood chips
- You notice burnt wood or smoke
- You have to push the saw to make it cut
- The saw pulls to one side during a cut
A light touch-up every few hours of cutting keeps your chain sharp and reduces the need for deeper regrinds later.
Electric Sharpeners vs. Manual Filing
| Method | Pros | Cons |
| Manual Filing | Inexpensive, precise control | Time-consuming, requires practice |
| Electric Sharpener | Fast, consistent, great for multiple chains | More expensive, needs power and setup |
Choose manual sharpening if you’re working on one saw and value portability. Go electric if you’re a pro or dealing with multiple chains regularly.
Common Mistakes to Avoid
- Using the wrong file size: Always match your file to your chain’s pitch.
- Inconsistent angles: Without a guide, it’s easy to lose your angle, resulting in uneven teeth.
- Skipping raker adjustment: Don’t sharpen cutters without checking the rakers.
- Over-filing: Too many strokes will wear down cutters faster than needed.
Signs You Might Need a New Chain
Sometimes sharpening isn’t enough. Replace your chain if:
- Teeth are broken, chipped, or excessively worn
- Chain is stretched and doesn’t fit well on the bar
- You’ve already filed it multiple times and the cutters are too short
A fresh chain is cheaper than replacing your bar—or suffering an accident due to poor performance.
How to Maintain Your Chain After Sharpening

Keep your sharpened chain in top condition by:
- Cleaning it after every use
- Lubricating before each cut
- Avoiding dirt, nails, or rocks
- Storing in a dry place to prevent rust
Master Your Chainsaw, One Tooth at a Time
Sharpening a chainsaw chain might seem intimidating at first, but once you get the hang of it, it’s empowering. It’s the difference between fighting your saw and working with it. Whether you’re clearing land, trimming trees, or cutting firewood, a sharp chain turns frustration into satisfaction.
A chainsaw is only as sharp as its chain—and now, you know exactly how to keep it that way.