How to Thread a Ratchet Strap: A Step-by-Step Guide You Can’t Afford to Get Wrong
Let’s suppose you’re on the side of the road, trying to secure your cargo with a ratchet strap. The clock is ticking, and your hands are shaking with frustration because the strap just won’t thread through the ratchet properly.
Sound familiar?
You’re not alone. Many people misuse ratchet straps—not because they’re careless, but because they were never taught the right way. If you’re transporting valuable items or heavy loads, threading a ratchet strap the wrong way can cause serious damage, injuries, or financial loss.
This guide will break down exactly how to thread a ratchet strap, why it’s critical to do it right, common mistakes to avoid, and safety considerations you shouldn’t ignore. Let’s make sure you never fumble with a ratchet strap again.
What Is a Ratchet Strap and Why Threading Matters

A ratchet strap—also known as a tie-down strap—is a strong webbing tool equipped with a ratcheting mechanism used to secure loads during transport. It’s commonly used with trucks, trailers, roof racks, and shipping containers.
But here’s the thing:
If you don’t thread it properly, the entire system fails. An improperly secured strap might loosen mid-transport, leading to cargo damage, legal issues, or road hazards.
So, the importance of proper threading? Absolutely critical.
Components of a Ratchet Strap (Know Your Tool)

Before jumping into threading, let’s quickly review the parts of a ratchet strap:
- Handle: The long lever used for tightening the strap.
- Release Lever: Small lever inside the handle for releasing tension.
- Axle/Spool: The rotating bar that holds the threaded strap.
- Fixed End: The shorter strap connected to the ratchet body with a hook.
- Free End: The longer strap you thread through the ratchet.
Understanding these components will make the threading process far easier and more intuitive.
How to Thread a Ratchet Strap: Step-by-Step Guide
Here’s your ultimate breakdown:
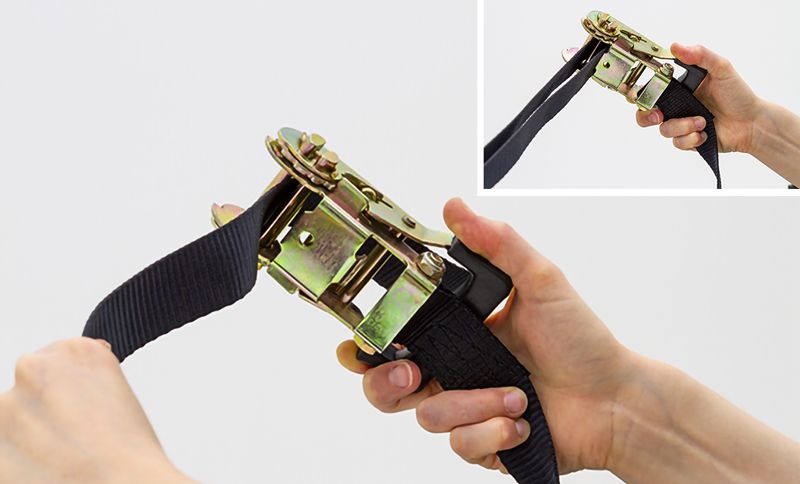
Step 1: Open the Ratchet Handle

- Pull the release lever to unlock the ratchet.
- Open the handle all the way until it’s flat (about 180 degrees) and exposes the spool.
This gives you access to thread the strap properly through the central slot.
Step 2: Insert the Free End of the Strap

- Take the free end of the webbing and feed it through the slot in the spool from underneath.
- Pull the strap through until there’s no slack, but don’t over-tighten.
Tip: Make sure the strap lies flat and untwisted as you pull it through. Twists lead to uneven tension and damage.
Step 3: Attach the Hooks

- Now attach the hooks on both ends of the strap to fixed anchor points (e.g., D-rings, rails, or other tie-downs).
- Ensure the anchor points are strong enough to withstand the tension.
Step 4: Tighten the Strap Using the Ratchet

- Begin ratcheting the handle back and forth.
- Each pump increases the tension and pulls the strap tighter.
- Continue until the load is secure and the strap is firm—but not overtightened.
Warning: Overtightening can crush or deform your cargo. Apply just enough tension to hold it securely in place.
Step 5: Close and Lock the Handle

- Once tightened, close the handle completely until it locks into place.
- This ensures the ratchet doesn’t loosen during transport.
How to Release the Strap
Knowing how to thread a ratchet strap is important—but releasing it properly is just as essential.
Here’s how:
- Pull the release lever and open the handle fully (again, to 180 degrees).
- This disengages the spool and loosens the strap.
- Pull the free end out to release the tension.
- Unhook the ends and rewind the strap neatly for next use.
Common Mistakes to Avoid
Even experienced users make errors. Here’s what you should never do:
- Threading from the wrong direction (always go from underneath the spool).
- Allowing twists in the strap—leads to instability.
- Overtightening—can damage cargo or cause strap failure.
- Using frayed or worn straps—weakens strength and increases breakage risk.
- Anchoring to weak points—may rip off or detach during transport.
Safety Considerations
Proper threading is only half the equation. Follow these tips for maximum safety:
- Inspect straps regularly for wear, cuts, or fraying.
- Use the right ratchet strap rating (working load limit) for your cargo.
- Avoid sharp edges—use corner protectors to prevent cuts to the webbing.
- Store straps in a dry, clean place when not in use.
- Replace damaged ratchets or hooks immediately.
Transport safety is non-negotiable—treat your equipment like it’s saving lives (because it could be).
How to Choose the Right Ratchet Strap
Choosing the right strap for your job is half the battle won. Consider the following:
- Working Load Limit (WLL): Always check the rated capacity.
- Strap Length: Long enough to wrap around and still allow ratcheting.
- Strap Width: Wider straps offer more grip and strength.
- Hook Style: J-hooks, flat hooks, snap hooks, etc., based on anchor type.
- Material: Polyester is the most common—it’s weather and abrasion resistant.
Right strap + proper threading = safe transport.
Final Thoughts
Threading a ratchet strap might seem minor until it goes wrong—and then it’s all you think about. Whether you’re securing a kayak, motorcycle, furniture, or heavy machinery, the correct method matters.
Improper threading can cost you time, money, and in extreme cases—lives.
But now that you know exactly how to thread a ratchet strap, you have the upper hand. Keep your loads secure, your stress low, and your confidence high by mastering this essential skill.